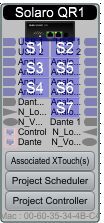
Yealink is a gloMissing Xilica “Download Project Backup File”. There are two different scenarios that will cause this: – When you push the file to the unit, you are prompted if you want to save the project or “cancel”. On first glance it’s easy to think that the “save” is to your PC when it actually saves the file to the unit itself for recovery. – If you have more than one QR1 in a project, the “Master” unit is the one that contains the backup file. Xilica elects the master unit as the one who arbitrarily holds the Project Scheduler. One option is to right-click on the unit and “Export Device Design to File”. You would then still have to create a new project but will have the option to “import” this file. It won’t have your Project controller configuration, etc. but will save you from having to start over for the actual DSP file.
Category: News
Tech TiP: Xilica/Wolfvision USB Audio Reset

ISSUE: Upon reset of either device by either system reboot, power failure or USB unplugging the levels of the USB card drop to 25 percent. This behavior is by design by the Xilica Engineers for safety at boot up.
REQUIRES FIRMWARE solaro_k02_usb_v9.9.xfw (obtain from )
SOLUTIONS: There are several options that will be described in detail below.
Automatic Commands from Wolfvision(Power-on)
On-Demand Commands from Wolfvision Control Centre
On-Demand Commands from Xilica Xtouch(logic solution)
HEX CODES AND THIRD-PARTY CONTROL NAMES
For the purposes of this example, we have used the following codes and names on the devices. You are free to use these codes and control names but the naming convention may interfere with your current system. (NOTE: when making control names, they are case sensitive)
USB SPEAKER
Xilica Control Name = “SpkrVol”
HEX convert = SET SpkrVol 100: “5345542053706b72566f6c203130300d”
USB MIC
Xilica Control Name = “MicVol”
HEX Convert = SET MicVol 100: “534554204d6963566f6c203130300d”
Automatic Commands from Wolfvision(Power ON)
During the “Power-On” sequence of any Cynap, the device can send out control commands via the Peripheral Control option tab in the menu.
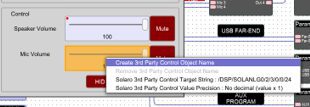
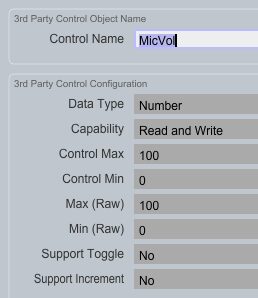
Start by naming the USB Mic Volume in Xilica Designer. Hold down the CTRL key + right mouse click to create a Third Party control name (Note: this is case sensitive)

In this example, it is named MicVol.

Press ok when done
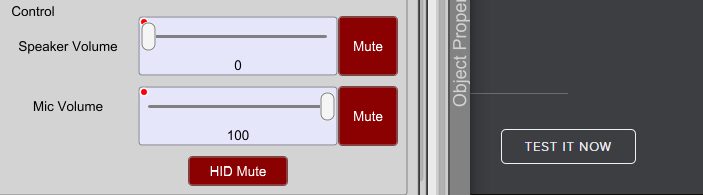
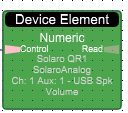
When successful in creating a control name to the Mic Volume, a RED control indicator will illuminate in the upper lefthand corner of the fader as shown below.

Repeat the previous steps for the USB speaker but name it “SpkrVol”
Log on the Wolfvision Cynap by entering the IP address into any web browser.
Enter the Password(default is “Password” unless it has been changed)
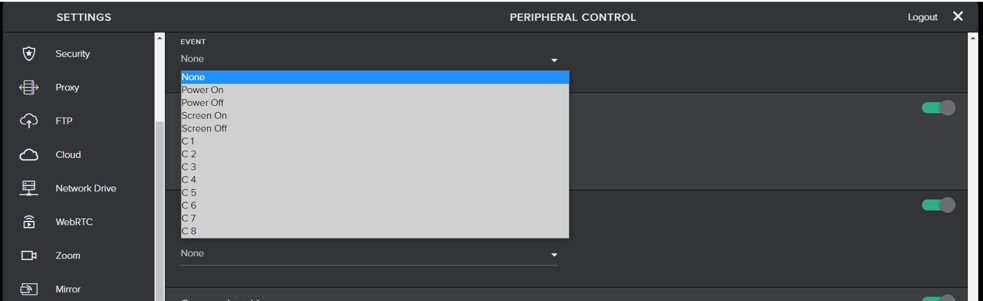
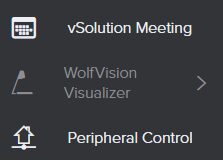
Navigate to the Peripheral Control Tab at the bottom of the lefthand menu
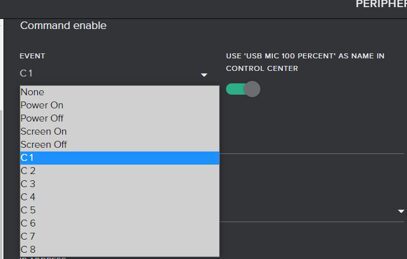
From the EVENT drop-down list select POWER-ON
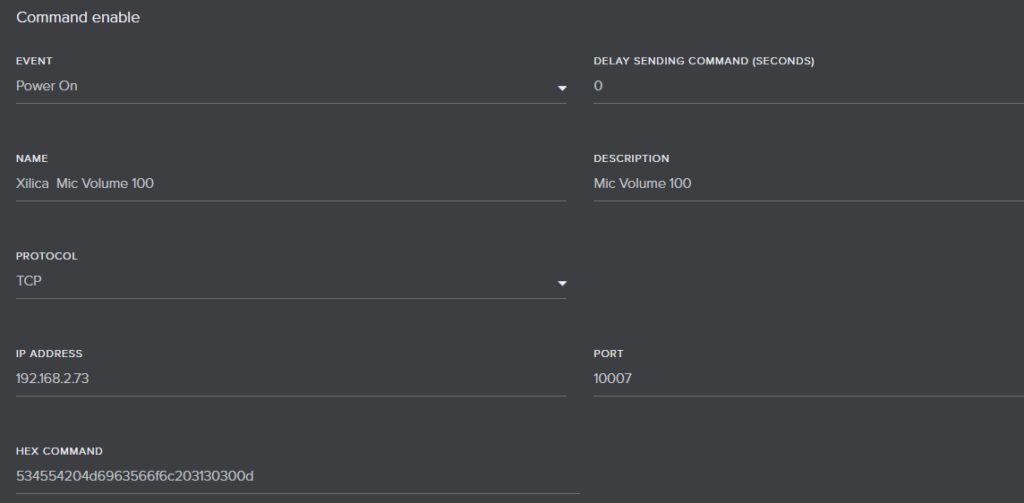
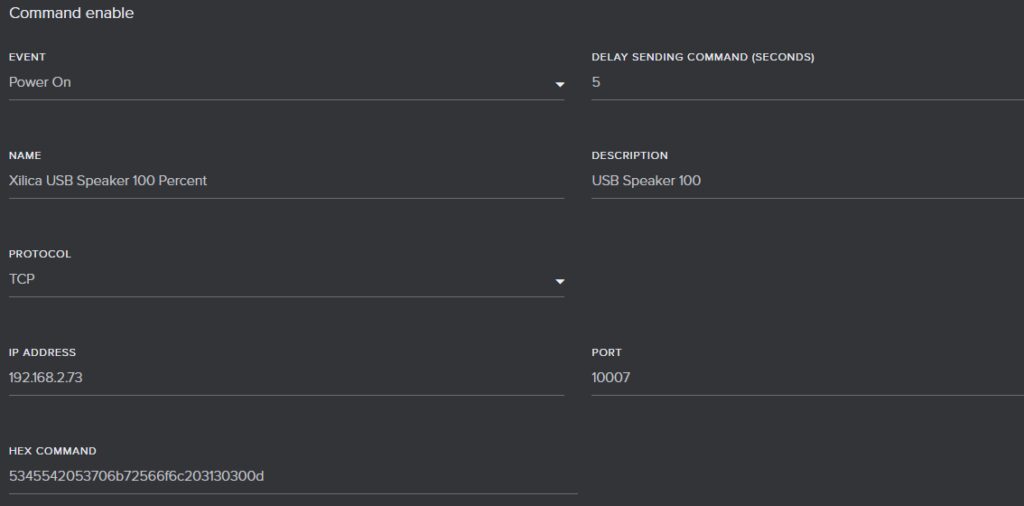
Enter the data in the fields(see HEX CODES AND THIRD-PARTY CONTROL NAMES)
The IP address will be the IP address of the Xilica Solaro in your system that you are wanting to control. For this example, the IP address shows the IP address of the Solaro for this example
USB Mic
USB Speaker(Note the delay of 5 seconds in sending the command. This will give some time for the previous command to complete)
NOTE: In the HEX field, there can be no spaces. The name and description are custom fields and can be you please.
Once the data is entered, please press “SAVE”. This will activate the control and prompt a “TEST IT NOW” icon to appear


Before pressing the “TEST IT NOW” button, return to Xilica Designer and load the design to the Solaro by pressing the “Load design to Device(s)” Icon

Ensure that you are ONLINE with the Solaro and open the USB input card.
Slide the Control Speaker and Mic to Zero.

(Note the two RED control indicators in each block)
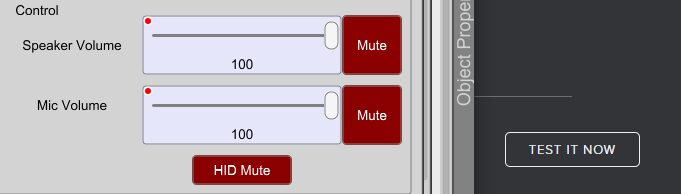
With the Wolfvision open in a browser and Xilica Designer open beside the Wolfvision screen, press the “TEST IT NOW” to ensure commands are working and volumes are being set to one hundred.

On-Demand Commands From Wolfvision Control Centre
On occasion the user may need to reset the levels in the Xilica due to a firmware update of the Xilica Solaro, power cycle of the Solaro or USB disconnection. The following will describe the on-demand solution of resetting the levels to 100 percent from the Wolfvision Command Centre.
Start by naming the USB Mic Volume in Xilica designer. Hold down the CTRL key + right mouse click to create a third party control name(Note: this is case sensitive)
In this example, it is named MicVol.
Press ok when done
When successful in creating a control name to the Mic Volume, a RED control indicator will illuminate in the upper lefthand corner of the fader as shown below.

Repeat the previous steps for the USB speaker but name it “SpkrVol”
Log on the Wolfvision Cynap by entering the IP address into any web browser.
Enter the Password (default is “Password” unless it has been changed)
Navigate to the Peripheral Control Tab at the bottom of the lefthand menu
From the EVENT drop-down list select C1
Enter all the data in the fields(see HEX CODES AND THIRD-PARTY CONTROL NAMES)
The IP address will be the IP address of the Xilica Solaro in your system that you are wanting to control. For this example, the IP address shows the IP address of the Solaro for this example.
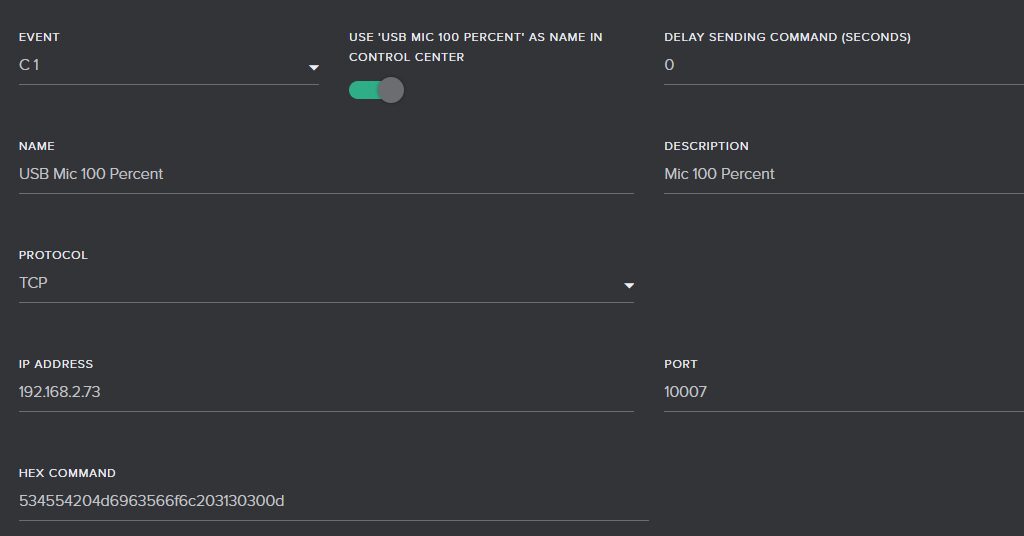
Be sure to have the “USE USB MIC 100 PERCENT AS NAME IN CONTROL PANEL” enabled
NOTE: In the HEX field, there can be no spaces. The name and description are custom fields and can be as you please.
Once the data is entered, please press “SAVE”. This will activate the control and prompt a “TEST IT NOW” icon to appear


Before pressing the “TEST IT NOW” button, return to Xilica Designer and load the design to the Solaro by pressing the “Load design to Device(s)” Icon

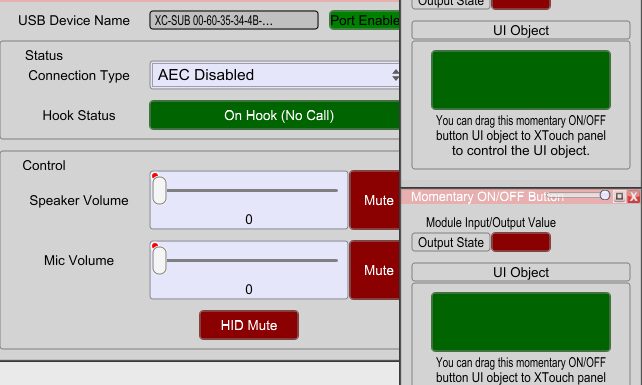
Ensure that you are ONLINE with the Solaro and open the USB input card.
Slide the Control Speaker and Mic to Zero.
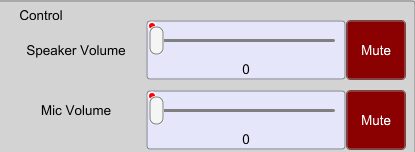
(Note the two RED control indicators in each block)
With the Wolfvision open in a browser and Xilica Designer open beside the Wolfvision screen, press the “TEST IT NOW” to ensure commands are working and volumes are being set to one hundred.

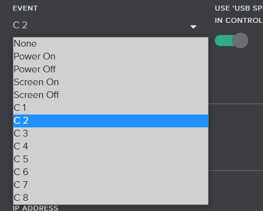
From the EVENT drop-down list select C2
Enter all the data in the fields (see HEX CODES AND THIRD-PARTY CONTROL NAMES)
The IP address will be the IP address of the Xilica Solaro in your system that you are wanting to control. For this example, the IP address shows the IP address of the Solaro for this example.
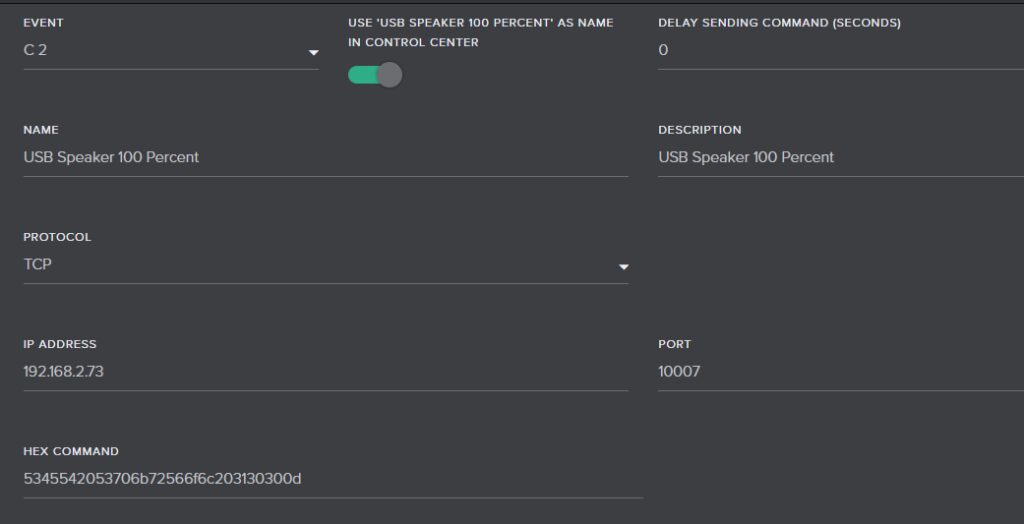
Be sure to have the “USE USB SPEAKER 100 PERCENT AS NAME IN CONTROL PANEL” enabled
NOTE: In the HEX field, there can be no spaces. The name and description are custom fields and can be as you please.
Once the data is entered, please press “SAVE”. This will activate the control and prompt a “TEST IT NOW” icon to appear


Before pressing the “TEST IT NOW” button, return to Xilica Designer and load the design to the Solaro by pressing the “Load design to Device(s)” Icon
Ensure that you are ONLINE with the Solaro and open the USB input card.
Slide the Control Speaker and Mic to Zero.
(Note the two RED control indicators in each block)
With the Wolfvision open in a browser and Xilica Designer open beside the Wolfvision screen, press the “TEST IT NOW” to ensure commands are working and volumes are being set to one hundred.


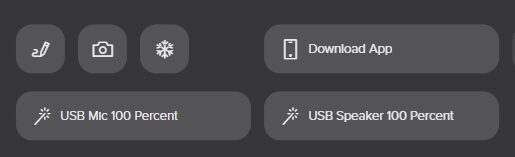
Open the control centre on the main page of the Wolfvision Cynap. Two icons will now appear that have been created through the control process.
Slide the Control Speaker and Mic to Zero.

Once either one of the icons are pressed, the corresponing volume will move to one hundred.

On-Demand Commands From Xilica Xtouch(logic solution)
On occasion the user may want to reset the levels in Xilica due to a firmware update of the Xilica Solaro, power cycle of the Solaro or USB disconnection. The following will describe the on-demand solution of resetting the levels to 100 percent from Xtouch panels or Designer.
While holding down the CTRL key, drag the USB Speaker Volume into the Project Controller section of Designer
This now gives an element controllable by logic
Next insert a Numeric Value Holder Module and modify Triger mode to “Level Trigger”
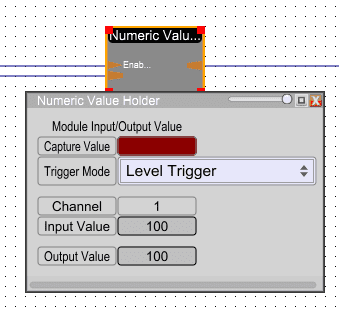
Insert a Numeric Constant Module and modify the Constant Values to “100”

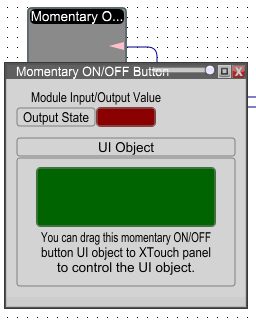
Finally, insert a Momentary ON/OFF Button. This is what you can place in an XTouch screen and activate the setting
Repeat previous steps for the Mic Volume and have a logic lay out like below.
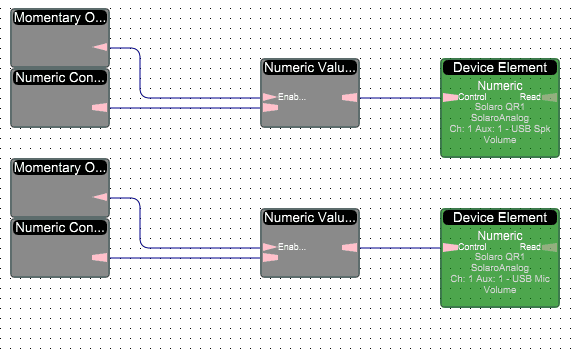
Save and “Load Design to Device(s)”

This can now be tested by going online and opening Project Controller and the USB input card.
The levels are set to zero.(Note: if using this method solely, the RED control indicator in the upper lefthand corner will not be present.)
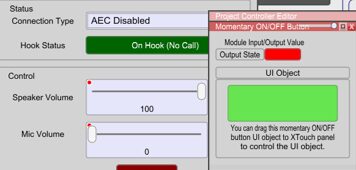
Once triggered by the UI object(momentary button), the volume will be set to one hundred.
—END—
Tech Tip: Modern Authentication for AMX AcendoBook & RoomBook Panels
After the decision by Microsoft to remove support for Basic Authentication in Exchange Online, we have been working feverishly to develop a solution that would enable Book customers to continue using their panels. We are pleased to announce a firmware update which will add support for Modern Authentication to Book Scheduling panels through RMS.
This new firmware will add the ability for Book panels to connect to RMS without the need for a NetLinx processor or any programming. RMS, which supports Modern Authentication, will handle communications to Exchange and distribute the room schedules to each Book panel.In order to handle the Modern Authentication for the RoomBook panels, an RMS installation is required. This software is required to be installed in Windows Server environments. A virtual server is acceptable for these installations, and details on the requirements can be obtained from the documentation for RMS or from Technical Support. See https://www.amx.com/en-US/product_families/resource-management-suite-rms for information on RMS.
The steps to an RMS installation are as follows:
1. Set up a Windows Server (virtual is fine) to run the RMS server application. If an external SQL database is available for hosting the RMS database, then it can be used instead of a separate SQL server being required.
2. Download and install the RMS Server application on the server set up in Step 1 and then walk through the RMS Configuration portion to set up the server. The RMS server application is available here https://www.amx.com/en-US/softwares/resource-management-suite-enterprise-v4-8-2
3. Set up a Windows Server to run the RMS Scheduling Server application. This will be the server that will handle the connection to Exchange/Office365 using Modern Authentication.
4. Download and install the RMS Scheduling App for Exchange onto the server set up in step 3 and then walk through the configuration portion to set up communication to Exchange/O365 and connect to the necessary mailboxes. This server will also connect to the RMS Server application set up in step 2. This application can be downloaded here https://www.amx.com/en-US/softwares/rms-enterprise-scheduling-interface-for-exchange-v1-2-3
5. Upgrade each RoomBook Panel to the new firmware. There are different files for the MD/MT panels and AcendoBook/RoomBook panels. Install the firmware appropriate for the panel being used.
6. Configure each RoomBook panel to point to the newly configured RMS server and then add that panel as a location in RMS that corresponds to its mailbox.
Harman Technical Support is available to discuss the server requirements for hosting RMS and is also available remotely to help with the actual installations and setup if desired.
Patton Uplifts the City Church Media System with AVoIP Gateways
The sound and video system at City Church (Madison Wisconsin) was out of date. The 800-seat auditorium needed an integrated audio-video network that could also serve other parts of the building as well as remotely located people attending services via live streaming multimedia.
Dante AV technology from Audinate brings audio and video together on a single Ethernet-based network. Patton is the first-ever company to implement Dante AV with its FiberPlex 6000 AVoIP Gateway product line. Patton’s AVoIP gateway was a perfect fit for the needs of City Church.
Employing the Patton gateways, City Church was able to migrate its disparate audio and video systems into a single, centrally managed network that provides live, onsite multi-media, that can be distributed throughout the building, as well as live-streamed audio-video for remotely-located worshippers.
>Read the Press Release
Patton AVoIP Gateways Transform Real-Time Experience for City Church Congregation
“We have always believed in using technology to eliminate distractions and deliver our message in a clear, compelling, and engaging way,” said Nathan Rohde, worship pastor, City Church.
“We basically just did a complete overhaul of the entire sanctuary so we can now integrate audio and video seamlessly throughout our church, our education facilities and online,” Mr. Rohde said.
What did you think?
- Is your house of worship (HOW) in need of a media-system update?
- Does consolidating disparate audio and video networks into a single centrally managed system sound like a good idea to you?
Let’s Connect in Toronto!

Wed, 9 November 2022 – 9:00AM – 4:00PM EST
Sandman Signature Toronto Airport Hotel, 55 Reading Court Toronto, ON M9W 7K7
Sandman Signature Toronto Airport Hotel – Google Maps
Attend our 1st leg of the Let’s Connect 2022 Techni+Contact/AMX Canada Roadshow in Toronto!
Meet and speak with leading industry manufacturers from AMX by Harman, Patton Electronics, Spinetix, Stewart Audio, Utelogy, WolfVision, and more! Network with top Audio/Visual, UC and IT integrators, consultants and end users.
In addition to tabletop product displays and functional demos, seminars will be offered throughout the day on key industry topics and solutions for the Educational, Government and Corporate markets with emphasis on active learning, web conferencing, and unified communications:
- 10:00 -10:30 The Future of Control and Unified Solutions with AMX by Harman
- 11:00- 11:30 Network AV-based Solutions for Collaboration Spaces by Jon Ivar of WolfVision
- 12:30-1:00 Keynote Consultant Engagement (TBC)
- 2:00-2:30 The Future of Control and Unified Solutions with AMX by Harman
- 3:00-3:30 Network AV-based Solutions for Collaboration Spaces by Jon Ivar of WolfVision

Refreshments and lunch offered. Come get your swag, giveaways and door prizes!
More details to come!
University of Westminster case study
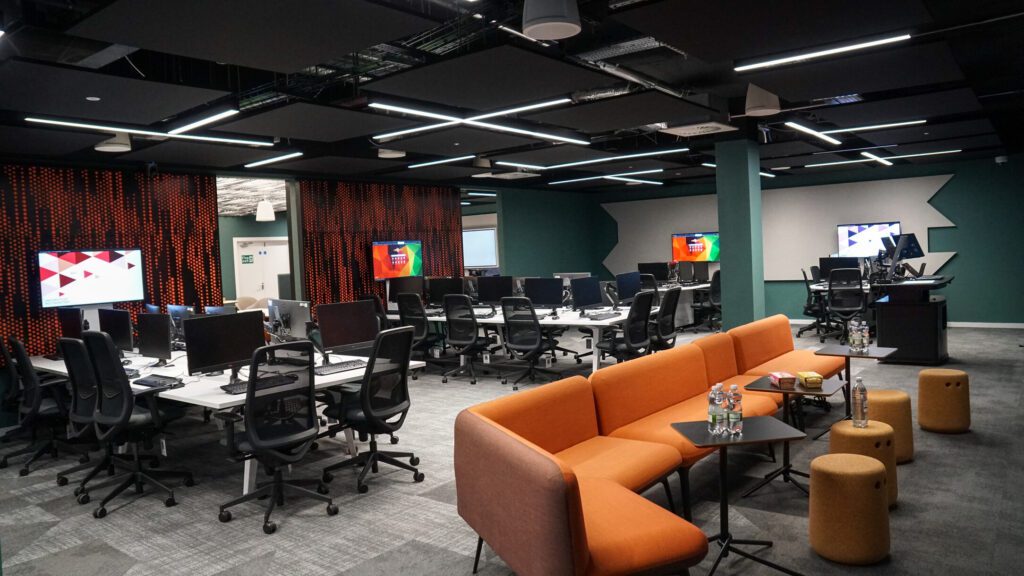
We would like to highlight our latest case study, focusing on the outstanding Cynap / vSolution MATRIX-equipped active learning classrooms at The University of Westminster in London. This award-winning, flexible AV over IP-based technology is ideal for multi-screen, collaborative working and learning environments of all types.
PChanges to Cynap Pure & Cynap Pure Receiver systems
We are currently introducing changes to some of our Cynap Pure products. The Cynap Pure and the Cynap Pure Receiver will shortly be delivered using new hardware with the same form factor as the Cynap Pure Mini. The new hardware is significantly smaller, consumes over 50 percent less power, and is equipped with two USB ports in addition to its HDMI, LAN, and WLAN interfaces.
Apart from the new hardware, there are no other changes for the end user! Screen mirroring using AirPlay, Chromecast or Miracast, touchback and remote viewer functionality, secure encryption, flexible installation options, API modules for room control, remote management tools, free firmware updates, and more – all are available as before when using Cynap Pure solutions.
Changeover to the new hardware will take place during September. We have a large quantity of the new platform devices in stock and can deliver quickly.
WolfVision evidence presentation systems for in-person, hybrid & virtual courts
Key advantages of WolfVision courtroom systems
- Easy-to-use, AVoIP evidence presentation, web conferencing, and distribution solution for courtrooms
- Judges stay in control of evidence presentation at all times
- Cost-effective technology – no racks full of equipment or room control system needed
- Cynap as centrepiece AV appliance, runs vSolution MATRIX connected to Cynap Pure Receivers and WolfVision Visualizer providing versatile end-to-end, all-in-one multi-source, digital and analogue evidence presentation system
- Hybrid courtrooms remain popular because they bring greater efficiencies
- Hybrid workflows save time, make scheduling easier, and help to reduce backlogs.

Preserving the integrity of the court process
- Using ‘Preview’, ‘Publish’, and ‘Stop Sharing’ options, the judge, or clerk of the court uses simple drag and drop movements to push on-screen content for the judge to preview, or for jury, plaintiff, or defense attorneys to view.
- Judges decide if evidence is admissible, and ‘Protected Mode’ ensures that attorneys cannot send on-screen content directly to a jury for viewing.
- Electronic evidence is distributed using either wireless presentation, or via a wired HDMI connection. Physical materials are shown via the document camera.
- Presented evidence can also be distributed outside of the physical courtroom during virtual court sessions.

Presenting evidence from any source
- Wireless connectivity using any laptop, smartphone, or tablet
- Support for AirPlay, Miracast, and Chromecast means no apps or dongles are needed
- Live evidence is placed on the document camera
- Wired HDMI In available for judges, and attorneys who wish to use a cable
- Attorneys can also bring evidence on a USB stick and submit it to the judge
- Touchscreen annotation is available at the witness stand.
- Content is moderated and controlled using a simple drag-and-drop interface.

Supporting Virtual Courts
- Web conferencing via Zoom, Microsoft Teams, or WebRTC-based services.
- WolfVision’s vSolution App simplifies the web conferencing workflow making it quick and easy for the clerk of the court or judge to control.
- Simply adding a Cynap Pure Pro wireless presentation and collaboration system to external locations such as a jail, extends the physical courtroom. For example, greater efficiency is achieved when prisoners can attend arraignments remotely via web conference.

Maximum Security in the courtroom
- The system is always used in ‘Protected Mode’ to prevent unwanted or mis-timed display of evidence materials
- Wireless signal strength can be adjusted to create only a small area of connectivity around the attorney tables. This prevents unauthorized attempts to disrupt court proceedings.
- Separate networks for court personnel and external visitors maintains security
- All wireless content is 100% encrypted
- On completion of the court session, no information is stored on a any WolfVision system.

Installation advantages
- Cost-effective – no more racks full of equipment needed
- Quick and easy installation
- Ease of use keeps training requirements to a minimum
- Customisable peripheral controls take care of the tasks that would normally require a room control system. Reduces cost, reduces number of boxes.
- Less boxes means fewer potential points of failure
- Easy integration with other infrastructure such as IP cameras, audio, & recording equipment.
- Eliminate compatibility issues between devices. All core functionality is performed using WolfVision systems
- Standard design already widely used. Simply adjust the number of Cynap Pure Receivers needed, depending on how many extra screens are required in the room.

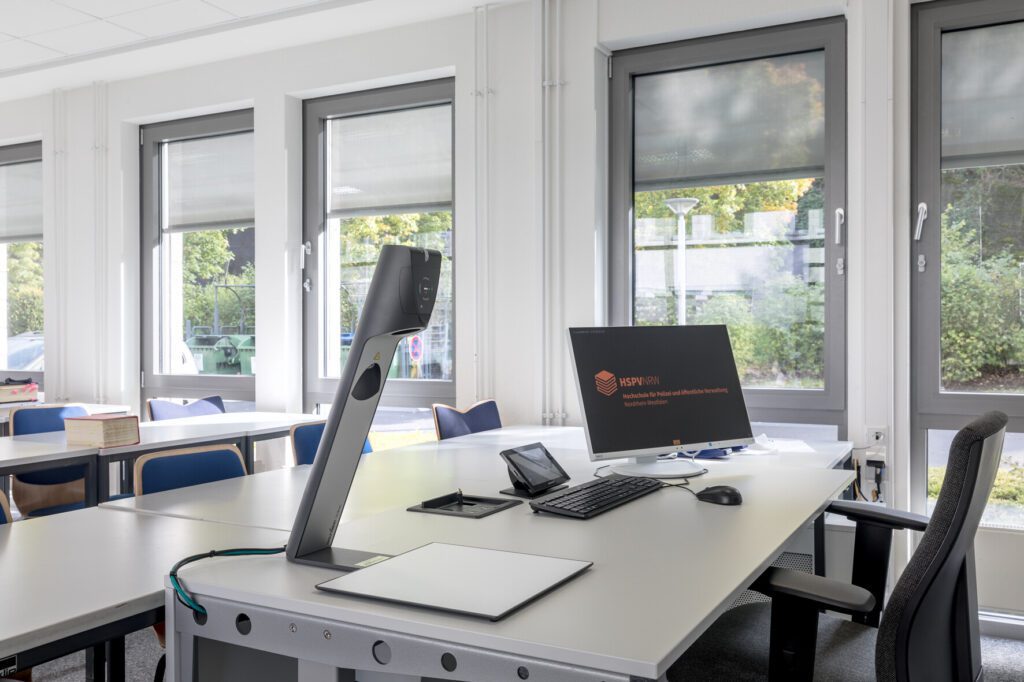
Everything you need to know about document cameras!
We take you through some of the most important factors when considering what to buy!
What is a document camera / Visualizer?
A document camera (or Visualizer / Visualiser as they are also known) is a very flexible presentation tool. It consists of a camera combined with a light system, positioned over a reflection-free working surface.
Physical materials such as books, photographs, and other 3D objects can be placed simply onto the working surface. Content is picked up, and a high-resolution output signal provided to projectors or monitors for on-screen display.
When a Visualizer is connected to a computer using a web conferencing service, images and video are easily shown to both in-room, and remote classroom or meeting participants.
Document cameras are popular in education, business and judicial environments. They provide excellent imaging possibilities for working and learning applications of all types. They are commonly either installed onto a tabletop surface, or alternatively attached to or recessed into a ceiling.
How can a Visualizer improve your presentations?
Many studies* indicate that presentations made using a document camera or Visualizer, can help to make learning easier. Information presented visually is much easier to remember, and is retained for far longer than information presented only orally.
Combining materials to be presented using a document camera with other content such as PowerPoint slides, enables the media content source to be switched regularly, which helps to refresh audience attention spans. For hybrid working and learning, a document camera, when attached to a computer running a web conferencing application, helps to provide a consistent working and learning experience, for both in-person, and online meeting attendees. This is because everybody in the session sees the same on-screen content, wherever they are located.
References: Whitepaper ‘Using Visualizers to optimise presentation‘ by Chris Atherton 2011, Study by Nickerson RS (1968). A note on long-term recognition memory for pictorial material. Psychon. Sci 11(2):58-59 Survey of Wall Street Journal, ‘We don‘t pay attention to boring things‘ (Brain rules‘ by John Medina).
Next up, we’ll explore buying considerations! Stay tuned.
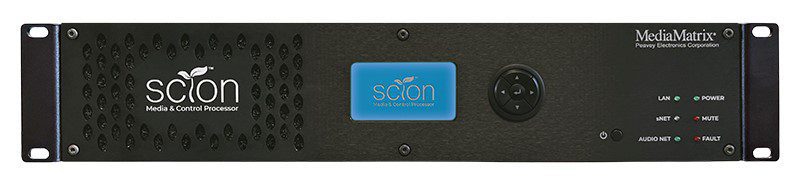
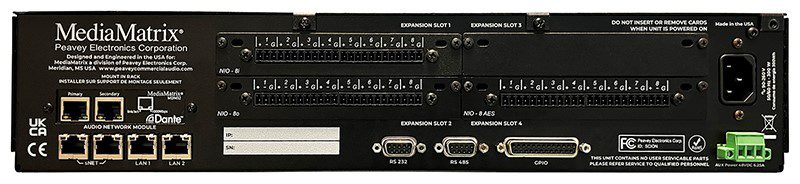
Introducing the MediaMatrix SCION!
Peavey® Launches Third Generation MediaMatrix® SCION® Platform at InfoComm 2022
MediaMatrix®introduces SCION®, the all-new and powerful Media and Control processor. Shaping the third generation MediaMatrix offering, SCION calls upon 30 years of engineering prowess and market expertise in DSP and networked audio to deliver the most powerful media and control system available today.
SCION, a descendant of the legendary MediaMatrix NION® platform, transcends its predecessor leveraging ADi’s cutting-edge SHARC® DSP architecture providing a fully scalable, configurable and flexible media and control processing system. At the heart of the new Peavey MediaMatrix ‘S’ series ecosystem – PCA announces MediaMatrix sNET™ the native AES67 media transport protocol capable of delivering up to 512×512 networked audio channels from a single device. Designed as a ‘Build it Your Way’ system, the SCION frame can be configured from an entry-level device to a fully-featured powerhouse or something in-between with optional hardware modules giving the consultant, integrator, and end-user unrivaled fit for purpose flexibility.
Sharing in some strong elements of DNA with NION paves the way for backwards compatibility and convergence, allowing consultants to design system upgrades and fresh projects with the confidence of a simplified and seamless migration path thanks to NWare™ 3.0’s new dual-compiler tool enabling SCION and NION nodes to coexist in the same project. NIO™ Card-based I/O is also compatible with SCION providing welcomed continuity, quality and flexibility.
SCION represents the evolution of MediaMatrix and as the meaning of its name suggests a ‘shoot’ that has taken root and continues to grow organically symbolized as a tree with branches and offshoots growing as companion control and I/O products forming to shape a rich ecosystem known as the ‘S’ series.
As the world’s first digitally configured and controlled distributed audio system, MediaMatrix has grown from roots of wisdom, through decades of understanding. The launch of SCION signifies innovation in full bloom – a technology and ideal that has been nurtured over time and is ready to flex its branches to accommodate the world’s most demanding commercial audio needs.
AMX Tech Tip: Modifying SVSI’s Default Multicast Subnet
A question that is commonly asked is – “Can I change the multicast subnet that SVSI uses”? And the answer is “Yes”!
Before we dive into the how, let us look at which subnets are used in SVSI for audio and video traffic.
These values represent non-interleaved multicast streams (N2300 series use interleaved multicast streams and are not part of this addressing range) and stream numbers < 256. Stream numbers >256 require calculating the large stream number (third octet) (covered in the Networked AV Training Course).
- Video: 239.255.37. <stream number>
- Audio: 239.255.165. <stream number>
The subnet range above (in red) is what we are interested in modifying.
Things to consider when choosing a multicast subnet:
Chose an address range between 234.0.0.0-238.255.255.255, this is the largest
unallocated block.
Because there is an overlap of IP Multicast addresses to Ethernet MAC multicast addresses,
any multicast address in the [224-239].0.0.x and [224-239].128.0.x ranges should NOT be
used.
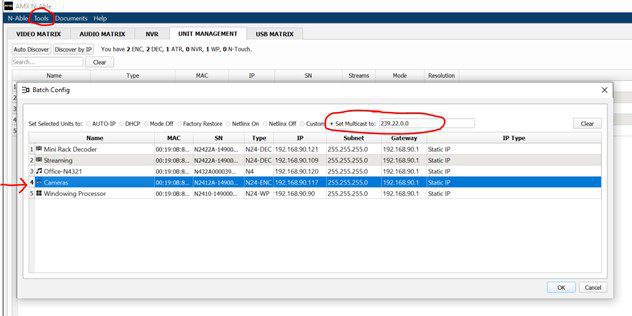
We use AMX’s “N-Able” software to modify the range (downloadable at amx.com).
- Launch N-Able on your PC.
- Make sure your devices have been “discovered” or added and are visible in the “Unit Management” tab.
- Navigate to “Tools” -> “Batch Config” and select “Set Multicast to:” (circled below).
- Enter your desired subnet.
- Select the devices that you wish to modify (red arrow below) and click “ok”